개요
Next.js 를 위해서는 자동 설치가 있고
공식문서: https://nextjs.org/docs/getting-started/installation#automatic-installation
수동 설치도 있다.
공식문서: https://nextjs.org/docs/getting-started/installation#manual-installation
수동 설치는 이 블로그에 더 자세히 적어놓았으니 참고 : https://x2bee.tistory.com/category/Next.js%20%EA%B0%9C%EB%B0%9C%20%EA%B0%80%EC%9D%B4%EB%93%9C/01.%20Set%20up
여기서는 create-next-app을 이용해 자동 설치를 한다.
Setup
1. create app
새 폴더 만들기
mkdir my-app
cd my-app
새 폴더에서 터미널 열기
npx create-next-app@latest .
✔ Would you like to use TypeScript? … No / Yes
✔ Would you like to use ESLint? … No / Yes
✔ Would you like to use Tailwind CSS? … No / Yes
✔ Would you like to use `src/` directory? … No / Yes
✔ Would you like to use App Router? (recommended) … No / Yes
✔ Would you like to customize the default import alias (@/*)? … No / Yes
5 Yes 후 1 No
설치 후 package.json 파일을 보면
{
  "name": "my-app",
  "version": "0.1.0",
  "private": true,
  "scripts": {
    "dev": "next dev",
    "build": "next build",
    "start": "next start",
    "lint": "next lint"
  },
  "dependencies": {
    "react": "^18",
    "react-dom": "^18",
    "next": "14.1.4"
  },
  "devDependencies": {
    "typescript": "^5",
    "@types/node": "^20",
    "@types/react": "^18",
    "@types/react-dom": "^18",
    "autoprefixer": "^10.0.1",
    "postcss": "^8",
    "tailwindcss": "^3.3.0",
    "eslint": "^8",
    "eslint-config-next": "14.1.4"
  }
}
기본적인 react, next, typescript, tailwindcss, eslint가 설치된 것을 볼 수 있다.
2. git 설정
gitlab.x2bee.com으로 접속 → New project을 생성
code .
git init
git remote add origin http://gitlab.x2bee.com/2024_16th_ojt/nextjs-fo-sample.git
git remote -v
git push
git add .
git commit -m 'my project'
git push origin main
3. 기본 템플릿 코드 삭제
npm run devglobals.css에서 3줄빼고 전부 삭제page.tsx에서<main></main>삭제tailwind.config.ts에서backgroundImage부분 삭제
Hello world 완성
globals.css의 3줄을 지우면 reset CSS가 사라짐
4. ESLint / Tailwind CSS Setup
위에서 기본적인 Tailwind CSS와 ESLint가 설치되었지만 추가 설정을 해주어야 한다.
pnpm add eslint-config-standard eslint-plugin-tailwindcss prettier eslint-config-prettier prettier-plugin-tailwindcss각 패키지 설명
- eslint-config-standard: 여러가지 ESLint중에 javascript 코드 품질을 체크해주는 Standard package 패키지 -> 개발팀 취향에 따라 다른 패키지로 변경 가능
- eslint-plugin-tailwindcss: Tailwind CSS에서 중복 utility class 사용 여부를 체크해주는 패키지
- prettier: Prettier라는 code formatter 패키지
- eslint-config-prettier:
기본적으로 ESLint는 코드 품질, Prettier는 formatting이지만, 중복되는 영역이 있다. 이 중복되는 영역에서 충돌이 생기면 피곤해진다. 이 패키지를 설치함으로 ESLint가 코드 품질에만 신경을 쓰고, code-formatting은 Prettier에게 위임하는 역할을 한다. - prettier-plugin-tailwindcss:
팀 내 각 개발자와 퍼블리셔마다 utility class 순서를 다르게 코딩할 수 있다.(예시: <div className=”mx-2 px-2”> 와 <div className=”px-2 mx-2”> 비교)
이를 위해 이 class의 순서를 일관성있게 자동으로 순서를 바꿔주는 패키지이다.
Tailwind CSS 창시자 Adam Wathan이 쓴 글 참조: https://tailwindcss.com/blog/automatic-class-sorting-with-prettier
.eslintrc.json에 다음 추가
{
  "extends": [
    "next/core-web-vitals",
    "standard",
    "plugin:tailwindcss/recommended",
    "prettier"
  ],
  "rules": {
    "no-undef": "off",
    "spaced-comment": "off",
  }
}
.prettierrc 파일 생성
{
  "printWidth": 80,
  "tabWidth": 2,
  "semi": true,
  "singleQuote": true,
  "useTabs": false,
  "endOfLine": "auto",
  "trailingComma": "es5",
  "arrowParens": "always",
  "bracketSpacing": true,
  "htmlWhitespaceSensitivity": "css",
  "jsxBracketSameLine": false,
  "jsxSingleQuote": false,
  "tsxSingleQuote": false,
  "proseWrap": "preserve",
  "quoteProps": "as-needed",
  "vueIndentScriptAndStyle": true,
  "requirePragma": false,
  "plugins": ["prettier-plugin-tailwindcss"]
}
5. VS code IDE 사용시 필요 extension 설치
1. ESLint

2. Prettier - Code formatter

3. Tailwind CSS IntelliSense

4. VS code에서 추가 세팅
(1) VS code에서 기본 설정 > 설정으로 들어가 Files: Associations를 검색한다.

위와 같이 .css와 tailwindcss를 추가해주어야 tailwindcss extension이 .css 파일에서도 적용된다.
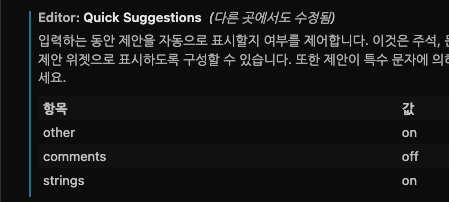
(2) Editor: quick suggestions에

strings: on을 해줘야 Intellisense add-on이 잘 동작한다.
테스트
ESLint 테스트를 위해 app/pages.tsx에
var a = "1";입력 후
npm run lint를 실행해본다.
에러가 뜨면 정상 동작.
'Frontend (Next.js Tailwind Typescript) > Next.js' 카테고리의 다른 글
| [Javascript] 제너레이터와 이터레이터 필요성 (0) | 2025.01.06 |
|---|---|
| Next.js에 remark-breaks 플러그인 설치 (2) | 2024.09.29 |
| fetch의 기본 사용법 (0) | 2024.02.16 |
| Nextjs Routing(Parallel Routes, Intercepting Routes) (0) | 2024.01.19 |
| Nextjs Routing(Router, Dynamic Routes, Route Group) (0) | 2024.01.18 |


